Sunday, May 29, 2011

BP8_RILS

Another friend of mine, Mitch over at The Exploratorium, created this great video synthesizing three tools in one relevant and innovative learning scenario. Read my comments here.


Saturday, May 28, 2011

BP8_RILS

My friend Joe over at Theoretically Speaking created this easy to use Web 2.0 tool called UJam


Read my comments here: Excellent tutorial, I never considered creating my own music.

ETC_FinalProject

Instructing Learners to use YouTube and FaceBook for Discussion 

The Realistic and Innovative Learning Scenario (RILS) detailed below explores how an educator, presenter, student learner can utilize YouTube as a channel for a vehicle for a online classroom. The social aspect of Facebook can be utilized for invitations as well direct link posts to the YouTube channel.  The documentary video shows how the user can create a channel on YouTube and publish to the YouTube population and thereby embedding links into Facebook to encourage more viewers and discussion on videos posted to the channel.

Target Audience
 – Educators, acupuncture students, presenters, patients, and medical professionals.

Materials – In order to successfully complete my RILS users will need:
- computer
- live discussion group
- internet connection
- video camera
- iMovie or video editing software

Objectives – At the end of this instructional session learners should be able to:
-Analyze different ways to use channels on YouTube by creating keywords and connectors for users to add comments and create their own channels.
- Design their own presence using YouTube channels, by customizing and relating their channel to learning and co-creation.
- Create their own invitations to view videos, share links to relevant information, and effectively promote discussion through a community style forum.

Procedure –
1. Create an account on YouTube and FaceBook.
2. Follow steps in creation of YouTube Channel, tags by relevant keywords.
3. Invite at least 10 target audience members to a relevant discussion on video archive.
4. Review and Respond to messages received.

Web 2.0 Tool – YouTube.com channels and FaceBook Invitation
YouTube is a way to get videos out to the open market. By using YouTube you can create your own person channel to promote ideas and discussion.

Social Participation/Social Learning 
YouTube can track how many times the video was viewed as well as comment "like" or  "dislike" and comments can be added in the form field below the video. Discussion is in an open format for all users to participate. FaceBook can be used to invite users to view and discuss on the topic video. The user will be able to respond to one another within the target audience. Participation is not guaranteed but encouraged.

Making Connections – Engaging all learners by having a video for viewing on your own time, while opening up a forum for further discussion on any particular subject matter. Since FaceBook is an extended invitation to the initial video post, YouTube will hold the stage for any user to access the learning environment.

Create/Produce – By the end of this learning scenario my target audience will be able to create a user account, channel, and upload a video on YouTube. The target audience will also have created a presence on FaceBook to interact and produce engaging messages and invites regarding the video implemented on their YouTube channel.

Assessment – 

  1. User will successfully create an account on both YouTube and FaceBook.
  2. User will successfully create a channel on YouTube.
  3. User will upload a video to their channel on YouTube.
  4. User will successfully generate an invitation on FaceBook, User will enter Emails of users they would like to participate will be entered in the "To:" field.
  5. User will click on "share" video and embed the link in the FaceBook invitation.
  6. User will initiate at least one discussion through the FaceBook invitation and the YouTube Channel. 
  7. User will know if their Channel is being viewed by the number of viewers stated on YouTube. The response and discussion can be collected and responded to and from both YouTube and FaceBook interaction. 
  8. If the user experiences no discussion but has viewer-ship an assessment whether which avenue is more desirable depends on the user and the purpose of their channel. 
  9. If the user experiences discussion or "like" versus "dislike", then the channel is a success.

Reflection – The reflection process will be observed through their comments on FaceBook and the YouTube Elemental Learning Channel as well. Once the challenge has been posted the day after the initial learning experience my target audience will be asked to make a quick post to their account to show the most important thing they learned through the RILS experience. I will reflect on my own RILS experience through personal interviews conducted and observation of my target audiences posts.


Saturday, May 21, 2011

PE5_YouTube

To further my exploration with YouTube I used it as an avenue to extend information via a public Channel at Pacific College of Oriental Medicine. Yesterday the college hosted a Integrative Discussion Group where five panelists discussed oncology in different healing modalities. I was the videographer for this event, which allowed my new iMovie skills to be utilized. Since video is a great way to engage many different technology users, this particular group of people were invited via a Facebook invite. Over 1400 people were notified of this event and were asked to R.S.V.P.. By using the PacificCollege channel on YouTube I was able to share these movies broken down into 10 minute segments to be watched in sequence by any user. By accessing the invite through FaceBook I was able to post the videos directly onto the invitation allowing all invited participants to comment and post their thoughts on the invite wall. To get the message out to more users, I posted the same links to view these videos on Deb Davies FaceBook wall, the creator of the invite and Chair of the discussion group. The purpose for using YouTube in tandem with FaceBook was to create more discussion and learning outside of the initial live discussion group. Stay tuned to see if this application worked.


1st segment of the discussion group.


2nd segment of the discussion group.


4th segment of the discussion group.

5th segment of the discussion group.

Final speaker presented.

PE4_YouTube

Considered the idea of using YouTube as a web 2.0 tool that could be used in any learning environment. I think of my experience with YouTube basically as a search engine for on-demand learning in a video format. But the funny thing is I had never posted or utilized this tool set. So you may ask your self "tool set", what does that mean? I decided to master YouTube by finally creating an account, there by creating my own personal channel. Interestingly, YouTube and Google email basically link and work together. Since Blogger works with YouTube video upload is even quicker now. Now my iGoogle page will now have my YouTube channel quickly available to utilize.
The process in creating a Channel is painless. I will say if you want your Channel to be found and utilized I suggest filling the "Channel Tags", with as many keywords relevant to your channel. 


The next step is to design your landing page.  There is only a few choices in color, so no need to spend too much time here. I picked a simple grey and white page.

Once your on board with an account and you are now uploading videos you can visualize traffic patterns and who is viewing your channel.
Stay tuned as I will be adding videos shortly.


Thursday, May 19, 2011

Visual Complexity

After watching David McCandless's Ted talk previously posted, my friend Gail Vogt of http://creativeinspiration.tumblr.com/ found this site for our visual pleasure.
The goal of VisualComplexity.com intends to be a unified resource space for anyone interested in the visualization of complex networks. The project's main goal is to leverage a critical understanding of different visualization methods, across a series of disciplines, as diverse as Biology, Social Networks or the World Wide Web. I truly hope this space can inspire, motivate and enlighten any person doing research on this field.

Sunday, May 15, 2011

David McCandless: The beauty of data visualization | Video on TED.com

David McCandless: The beauty of data visualization | Video on TED.com

A brilliant look at visual data. I am so inspired that information can be conceptualized in this way. David will open your eyes to the beauty of data.

BP7_OneMinuteVideo

Here's a commercial I created using the new iMovie tools learned recently on Lynda.com.
Check it out:

BP4_Lulu

Have you ever wanted to write a book and just had no idea where you would begin the process? You might assume that you have to submit your idea/book to every literary agent and publishing house that comes to mind. Not true with Lulu, a new model in publishing called "open publishing". This new model has paved the way for all writers and creators to take their ideas to any market. The name Lulu comes from the dictionary meaning; a remarkable person, object or idea.

In my profession I work with incredibly intelligent masters in the Oriental Medicine field. I manage and produce a Symposium highlighting these professionals. They lecture and present workshops to Acupuncture practitioners, Massage Therapists and Oriental Medicine Doctors. In the past few years I come across many new masters in this profession that have yet to be published. As this field grows and the public interest increases the need for information from a consumer to a professional increases. Social Networking has become the standard for most budding professionals as well as seasoned ones. With Lulu, you have publishing options, you can set your market parameters and make a 80% profit on all sales. Your product is printed by order, not automatically printed to fill bookshelves at book stores.

So if you have a following on Facebook you can market directly to that group of people. Or you can market on amazon.com. As you get started with Lulu author help is available every step of the way. From editing, to cover design, layout, formatting and the publishing process.
Lulu is FREE, you simply create a user name and password, now you can begin.
Since I am not ready to publish anything remarkable at this time, I decided to do the next best thing and make a calendar.
My mom and dad keep asking for my latest photos; so here goes.


The calendar was a simple drag and drop program. When you are ready to publish, your simply click on the green publish button in the right upper corner. My only snag in the process was the upload time. 
If you are interested in purchasing my calendar, purchase here: San Diego June 2011 to January 2012 Calendar. 


More additional ways to publish are; eBooks, Audio CDs and even DVDs. I can think of many people who can benefit by using Lulu professionally as well as personally. Take your remarkable ideas to the open market place with Lulu, you will not be disappointed.

BP6_TheoreticallySpeaking

Learn more about video editing with Joe Brightman on his blog Theoretically Speaking.
Check out my comments here.

BP5_MindisMind

Check out Mindi's Mind Blog, she reviews a Web 2.0 Tool called Dipity.


Mindi explains how she used Dipity in her 4th Grade classroom.

Check out my comments here.

PE2_iMovie


After completing the remainder of Lynda.com's iMovie'11 Essential Training Videos, I discovered many new features to add to my future video creations. The most important tool I discovered was the application of adding sound in multiple tracks while manipulating sound, quality and clarity. I created a simple 1 minute video from photos I had in iPhoto.


The instructor, Darrick Chow suggested to spend some time organizing your photos by naming and tagging them as to the type of footage for a more organized story board.  When creating new projects you can simply place the image in any sequence according to your story board format. Another tool tip Darrick further explored was "slip editing" and using the clip trimmer. I was impressed that slip editing allowed me to keep the tempo of my project aligned to music or theme and did not throw off the timing.
The Ken Burns effect enabled a still image to appear to have motion, by moving it from one point on the still to another point in the same still. Here is an image to illustrate this process.

Text is one feature that is limited in iMovie, and Darrick Chow explains that the font panel doesn't always let you use a font in your library. Something to keep in mind if you want to get fancy but find yourself limited. 

I find iMovie to be a brilliant and simple program to facilitate great movies in no time at all. I am excited to paint a wall blue or green, or maybe just buy a piece of fabric to create the same effect and produce background manipulated videos. Just like a news reporter on the weather channel. 

Saturday, May 14, 2011

PE3_iMovie

I did it I completed iMovie'11 Essential Training with Darrick Chow in 3 hours and 28 minutes on www.lynda.com


My next adventure in learning will focus on AfterEffects an Adobe Creative Suite program to enhance my next iMovie, using decorative and advance fonts with effects in animation.
Stay tuned for my next update.

PE1_iMovie

Starting anything new can be daunting. I decided to stretch my mind and comfort zone by using Lynda.com as my personal training tool. Most can attest to anything different, foreign, or simply not in your vocabulary mind-set as resistance. Resistance makes you want to put the covers over your head and not get out of bed, at least for me. So when addressing technology and your resistance I implore you to try something new. Now, if you are not familiar with Lynda.com and you are itching to stretch yourself, dive in to the many excellent training platforms designed for every type of user.

My current challenge is iMovie'11 Essential Training with Garrick Chow, the length of this tutorial in its entirety is 3 hours and 28 minutes. Since February 2011, I started dipping my toes into iMovie. I have made a few good videos with my limited knowledge and basic intuitive Apple skills. Though after watching a few chapters I can wrap my head around the many features and basic file extensions names that certain cameras and video cameras can inter play with iMovie.
Stay tuned as I report on the final half of my training.

Sunday, May 8, 2011

BP2_Bitstrips

Web 2.0 allowed the consumer to become the producer of all sorts of applications. In turn, the marriage of thought, action and social media/communication has put you and I in the driver seat of the information age.
A relatively new concept in learning is called connectivism; learning through actively engaging in every aspect of pulling information. Which includes many formats through the medium of the computer, leading to the world wide web, softwares, applications, gadgets, video and audio technology and the chaos list expands by the second.

Learn more here about "connectivism" here: http://www.elearnspace.org/Articles/connectivism.htm

In my search for a web 2.0 tool I decided to find something completely foreign to me. It's called Bit Strips, www.bitstrips.com a comic building site and it's free! Now you can upgrade to pay for the teaching addition, though I think it's great just as a free application.

Here is your "how to" when using Bit Strips.

    Open Account- This was an easy first step because I had an option to connect my login to my Facebook page. It then automatically created this page above. If I did not have a Facebook account I would simple use a user name and password, and sign in,  that easy.


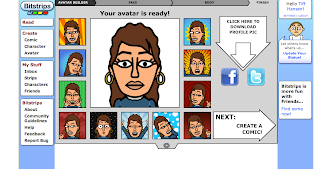
    Create your personal avatar/comic character. This process was very intuitive, the first prompt asks which gender your avatar is. Then the page above appears. The yellow highlighted hair/face shape above my avatar is one of the many choices in designing the character of my avatar. 


    Here I am!
    Once mastering the development of my avatar character I made three more characters of my classmates; Cindy, Joe and Mitch. 


    You can even create profiles of your characters.


    Create other characters or find already created characters. Here is Barack Obama, Sarah Palin, Groucho Marx, and Michael Moor. Just a few characters to grab and click into your comic strip.


    Here is the start of my comic strip.


    The layout of your comic strip. I chose a three rows, three columns.

    Scene development, just like when I created my avatar I navigate my choices in populating my strip. 
    I can drag scenes to my layout and characters. 


    Communicate using text boxes and dragging to your layout strip.


    Save and Publish
    Once you have completed your comic you click on save, you then have the choice on whether to publish to the web, Facebook or use a direct link to email.

    My first comic strip using Bit Strips. My theme was random acts of kindness and what it means to pay it forward. By using this format, I can see how using a comic strip in school can be another way of engaging students. As I apply comic strips to my work I can see my professional speakers using it as a tool to break up the monotony of a lecture or by posing a question, or making something amusing. The comic strip is a pleasing image and it engages a reader.

    Hope you will use this tool in your future story telling adventures.

    All images are screen shots of my process.

    Saturday, May 7, 2011

    BP3_iGoogle Screen Shots

    As my days get more "to do" intensive, I find myself de-cluttering my mind and my lists often. The idea of having all of your ducks in one place seems logical and just plain smart. Initially when I first created my iGoogle home page I found myself using the box of links and my gmail gadget the most. Over the past two months my tool kit, my interests, and my self learning has expanded. So, now its time to update the iGoogle page. I found that gadgets were easily searched and found. I added my new tools, links, social networking sites, etc., all for a clearer visual to my next task or interest.  I can truly wrap my head around using the iGoogle page as my "gateway" to the world wide web everyday.
    My first iGoogle home landing page.

    It's so simple to use as your home landing page. Go to the preferences tab on your browser, I use Safari, and put the direct link to your iGoogle page there. Now every time I turn on my computer and open Safari, it opens automatically. Yeah Google!


    I added multiple "Box of Links" and renaming them to help direct me quickly. For example: I have an FSO tab for all things related to Full Sail Online. A CBR tab for all things related to my Challenge Based Research Project. A ETC tab for all things related to current month's course. I also have a tab for Tools on the web. Finally a tab for the Professional me.

    Thursday, May 5, 2011

    BP1_Welcome to my blog.


    Welcome to my blog. I will be engaging educators and learners through technology and web 2.0 tools. My intention is to pass on my discoveries and experiences in a thought provoking manner that inspires and cultivates self-learning as well education-based learning.